Using UpSheets to Import Data from Subway / LiveIQ
Upload Subway Live IQ Data to Xero Payroll

UpSheets can upload your Subway Live IQ Labour data to Xero Payroll in just a few clicks.
- Easy to setup and use
- Export from Live IQ + upload to Xero
- Predefined Fast Food Industry Award (FFIA)
- Assign awards to employees
- Automatic calculations + overtime/allowances
- No additional Xero setup
- Multiple locations on a single account
- Faster, easier and lower cost than alternatives
- Get rid of expensive 3rd party rostering software
- Save time and money
- 30 day free trial
- Excellent support
Overview
If you are using Subway LiveIQ Labour to roster your staff, your data can be exported and uploaded to Xero using UpSheets in just a few clicks.
This guide explains the steps required to get started:
- Register for an UpSheets Account
- Configure settings in UpSheets
- Assign awards to employees
- Extract file from Subway LiveIQ Labour
- Validate the file in UpSheets
- Upload data to Xero
1. Register for an UpSheets Account
You can register for an UpSheets account at https://app.upsheets.com/register
No credit card is required and it is free to use for 30 days. You can either create an account using your email address, or log in using your Xero account.
After creating your account, you will be asked to connect UpSheets to Xero. This requires a Xero account with Payroll Administrator access and only needs to be done the first time you use an organisation.
We recommend using a free Xero Demo Company to try things out:
https://help.upsheets.com/faqs/using-a-xero-demo-company
2. Configure Settings in UpSheets
To import the Subway LiveIQ export file without having to modify it, configure your settings as below:
Enable Smart Formulas
Navigate to your settings https://app.upsheets.com/settings
Select Enable Smart Formulas and click Save

You will be shown a warning, read it and click I Agree to continue.
Set Default Start Time
A new Start Hour option will now be available. This value is used to calculate start and end times using the single hours column from the export.
For example:
| Start Hour | Hours (from export) | start_time | end_time |
|---|---|---|---|
| 06:00 | 12 | 06:00 | 18:00 |
| 06:00 | 6.5 | 06:00 | 12:30 |
| 08:00 | 2 | 08:00 | 10:00 |
Set the Start Hour value for your operation and Save.

3. Assign Awards to Employees
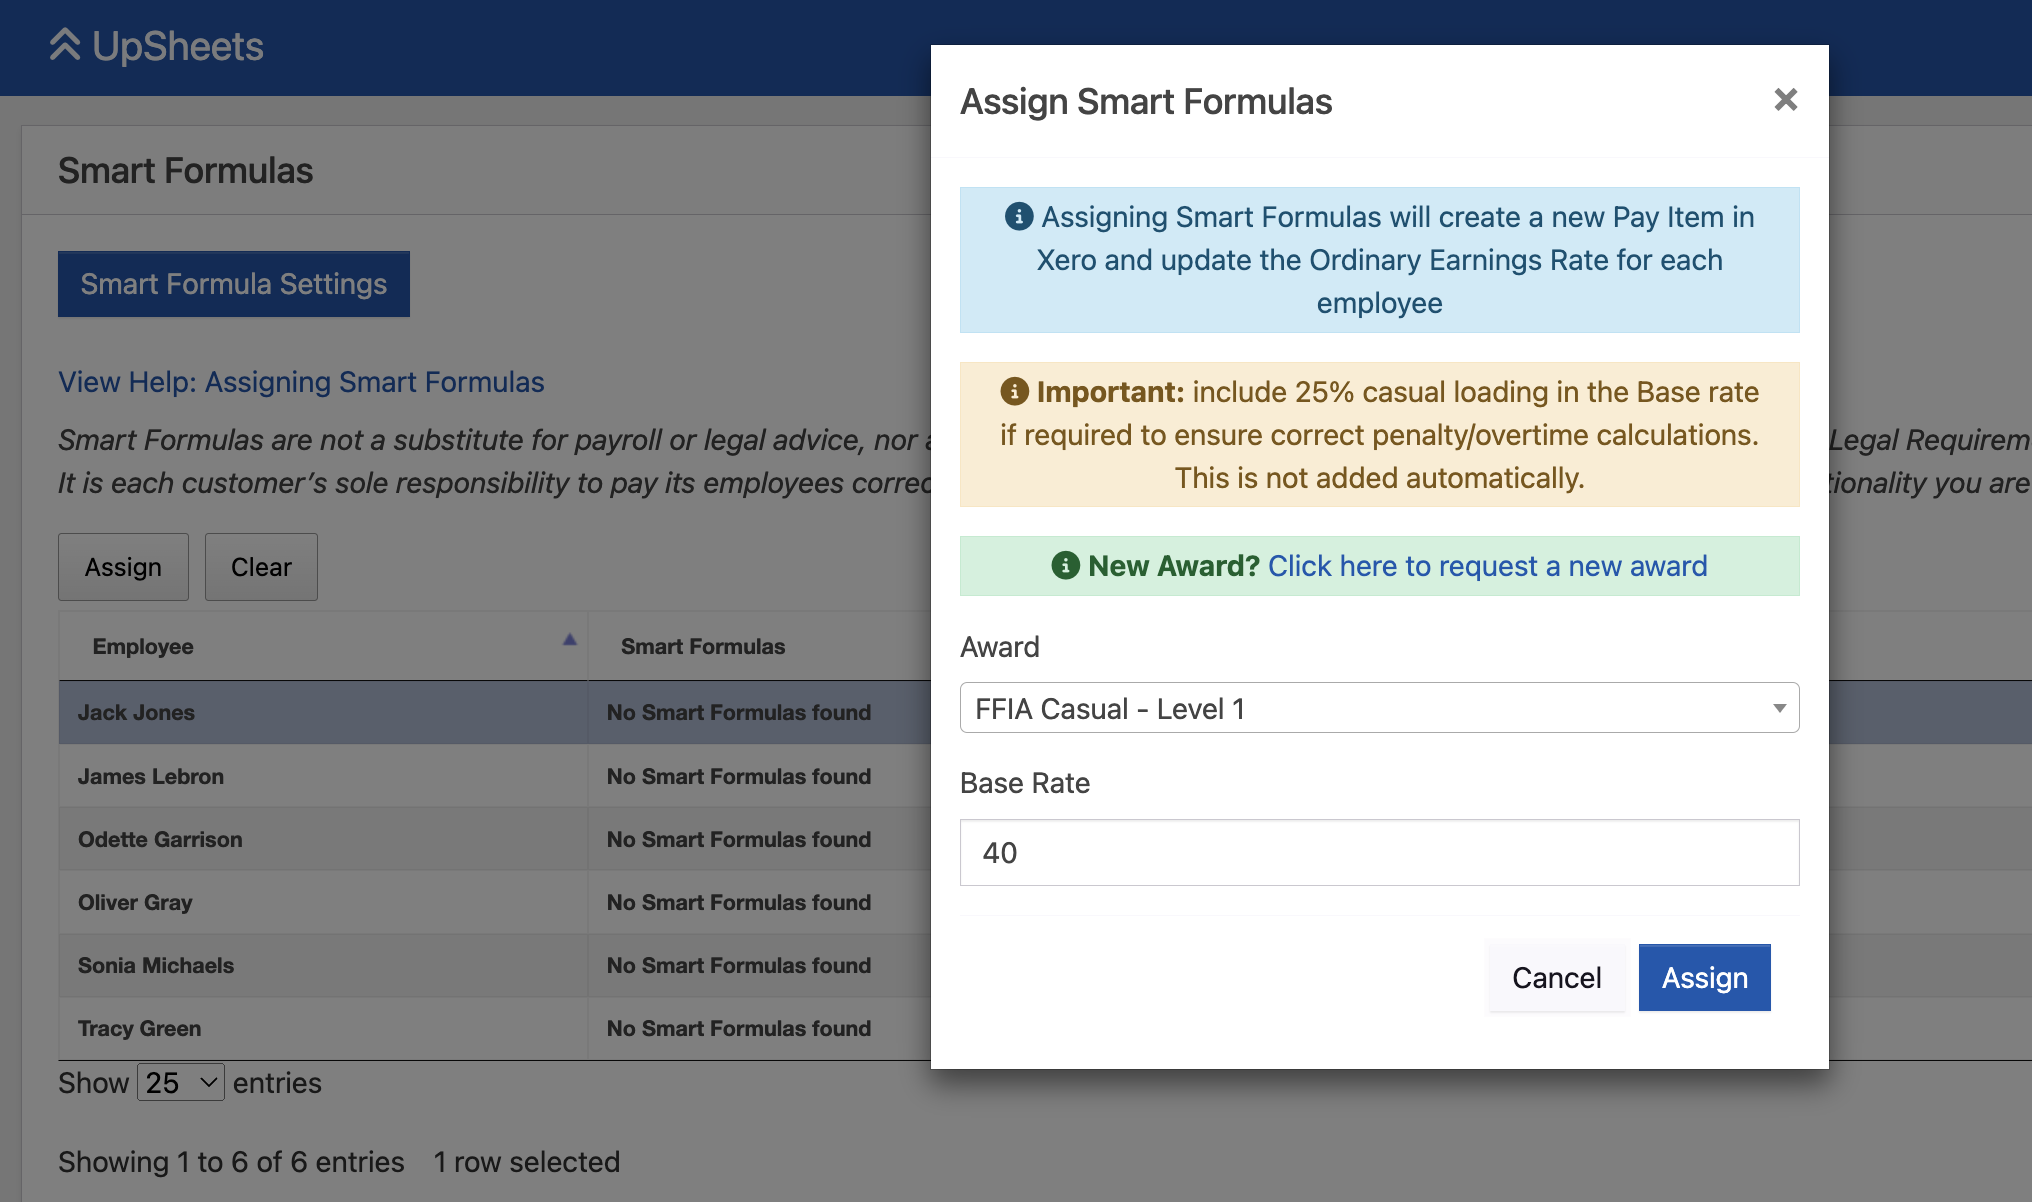
To determine the correct earnings rate and automatic allowances, each employee must have the required smart formula assigned to them.
Please note that this assignment will create a Pay Item in Xero and update the employee pay template and ordinary earnings rate to use it.
Select Smart Formulas from the menu and select Save to accept the default settings:

Select Smart Formulas from the menu and then select an employee row, then click Assign.
You can then select an award and enter the base rate for the employee. Click Assign to assign the award/rate to the employee.
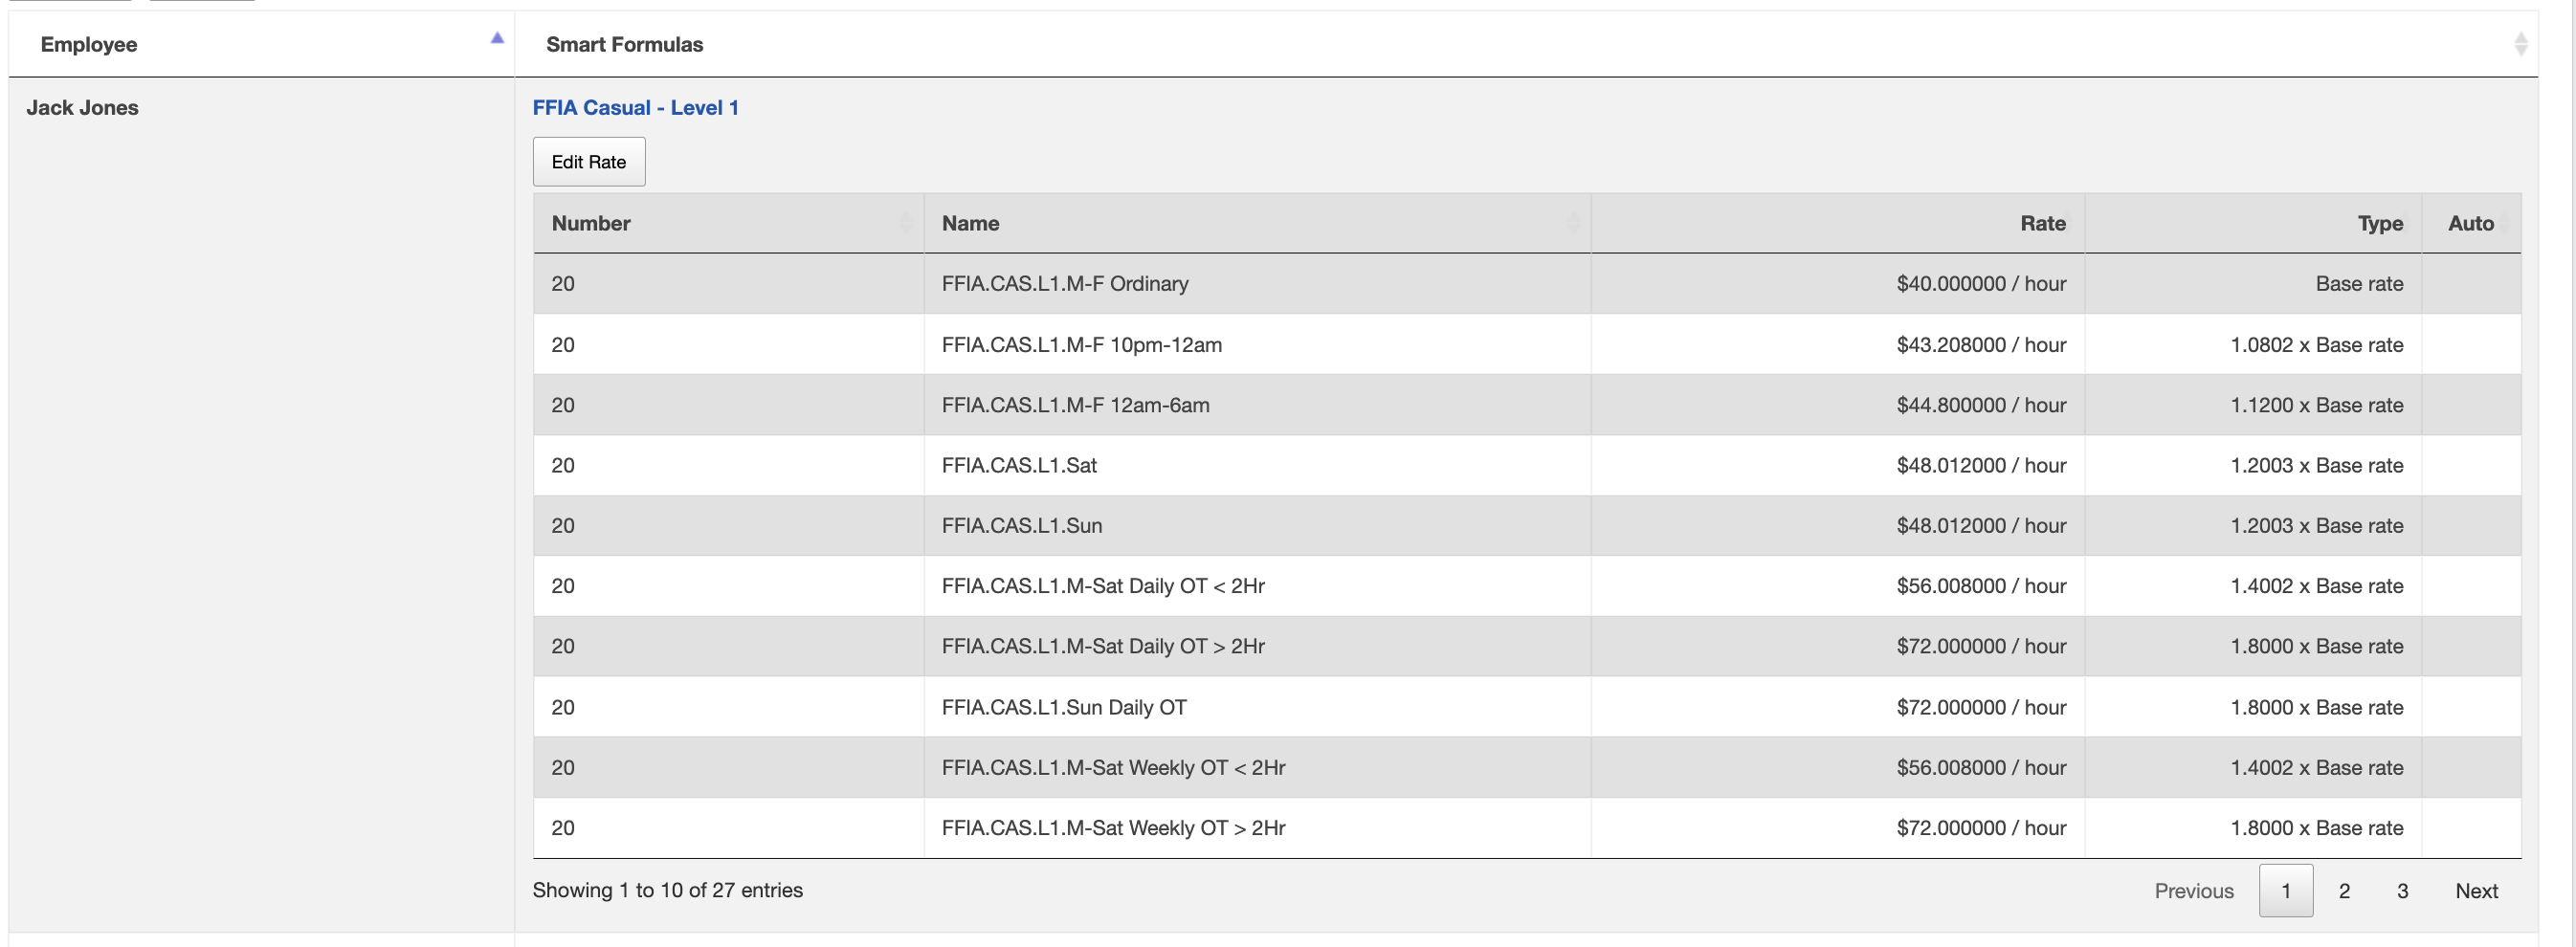
Automated allowances (Minimum Engagement, Laundry etc) can be enabled/disabled by following these instructions.
Repeat these steps for all employees you wish to upload data for.
4. Extract File from Subway LiveIQ Labour
The below assumes that you are using Subway Live IQ Labour as your rostering program and have made and published a roster for your stores. If you are unsure or just starting please reach out to your Business Consultant as they have User Guides to help you.
- Log into Subway Live IQ Labour
- Go into Payroll – Processing
- Action your team members' hours as to pay by timesheet or roster etc
- Once actioned and no errors showing, click Save then Finalise at the bottom of the page
- Return to the Payroll Processing screen and press Process
- Then go into Payroll – Breakdown
- At the bottom of this page click on Accounting Software Export (CSV)
- This is saved into Downloads (or choose where to save it). If you resave this file, ensure it is saved as a CSV file.
If you are unsure how to do any of the above tasks, please reach out to your Business Consultant for help.
5. Validate the File in UpSheets
From the Import screen in UpSheets, select your exported file and the Timesheets option and click Import File:
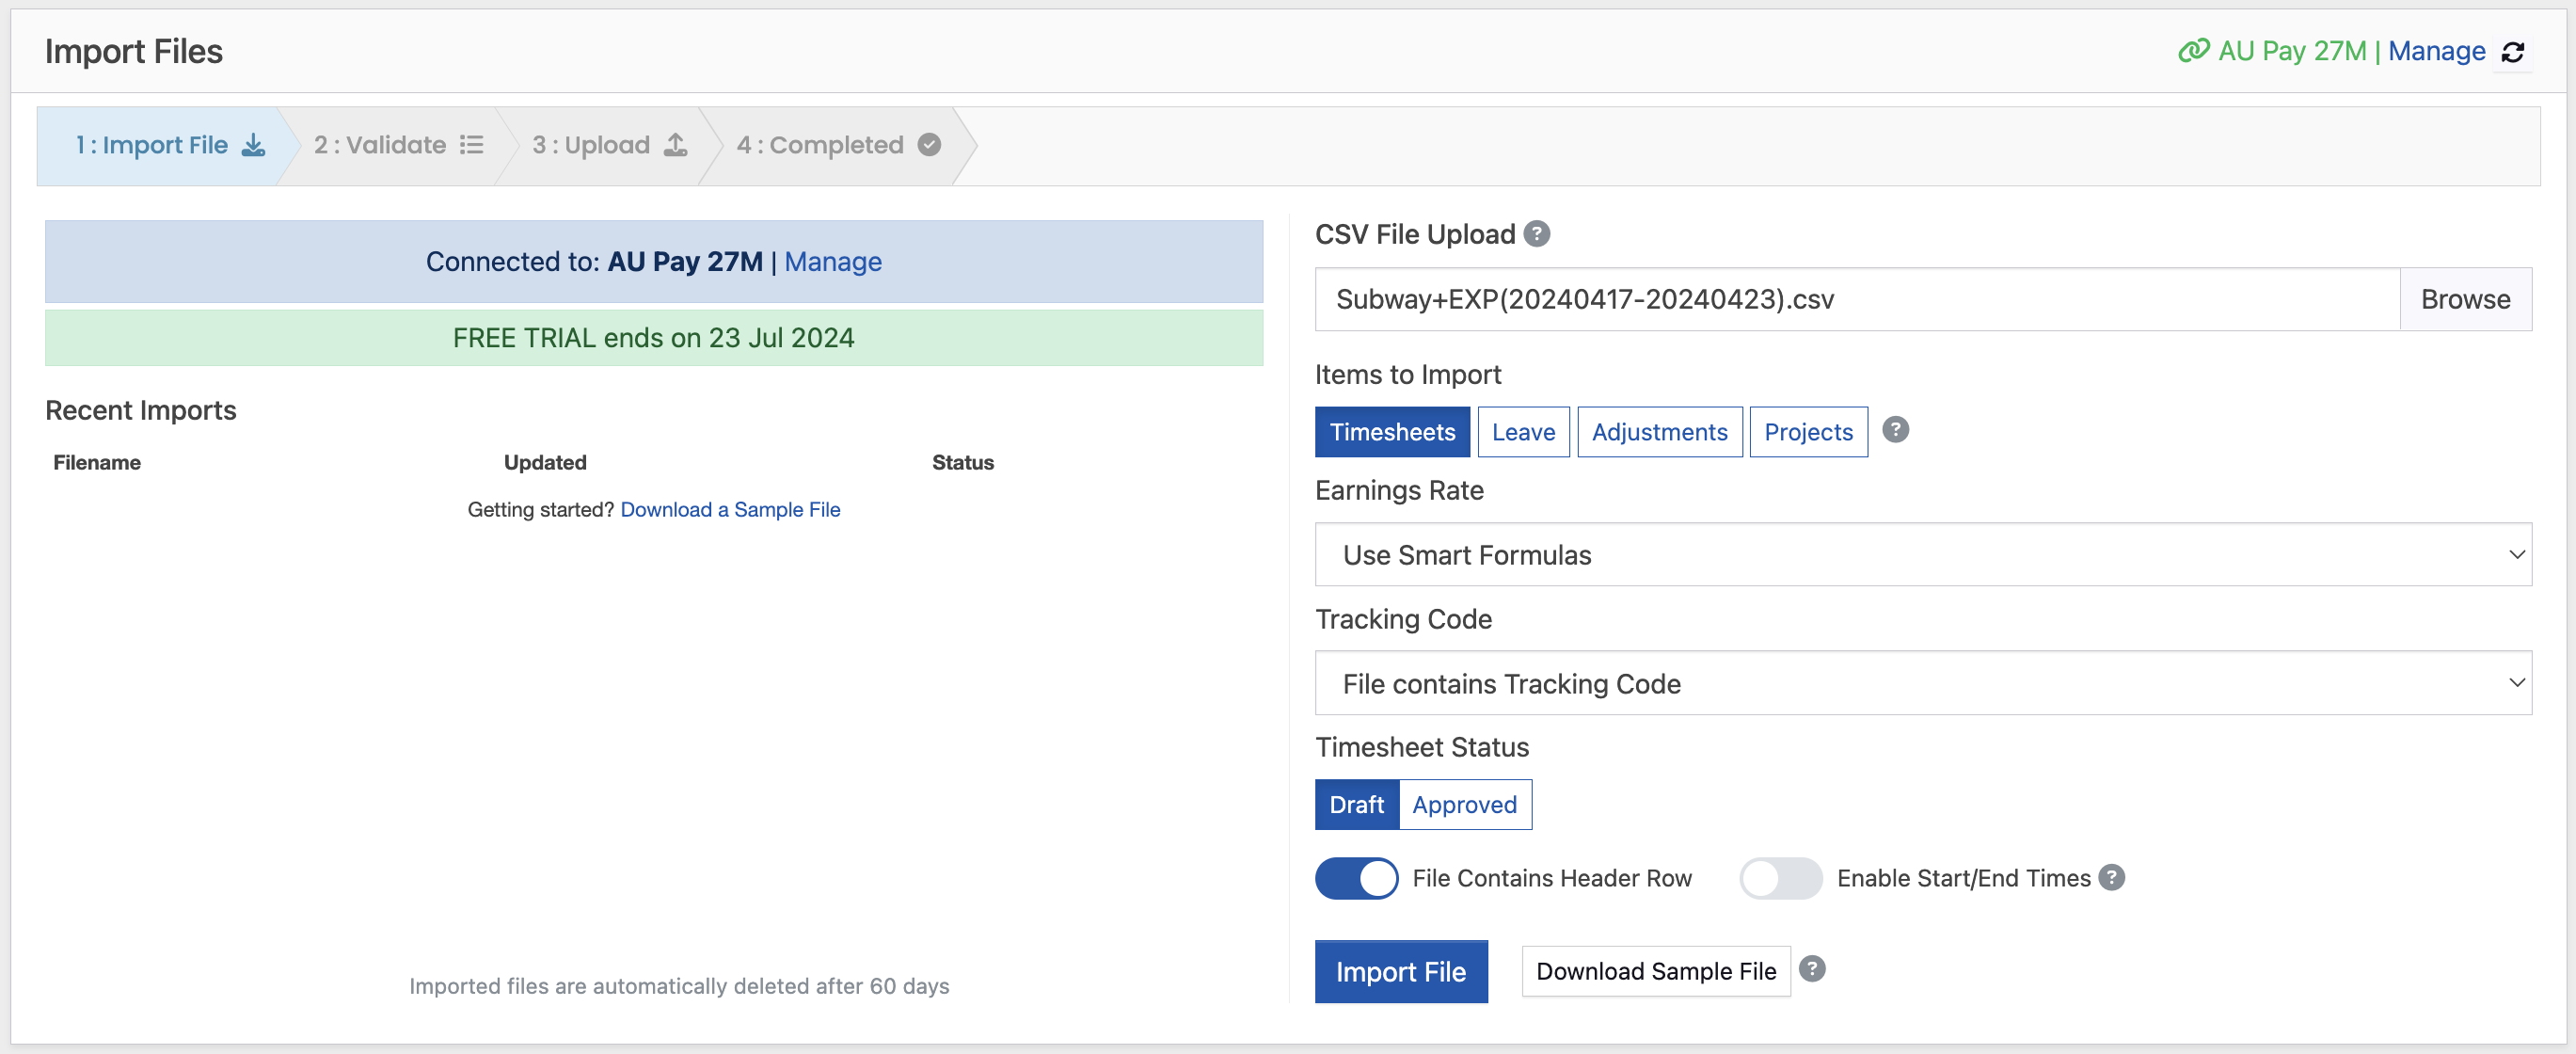
Make sure each column is mapped correctly and that US Date Format is on (tracking code is only required if enabled in Xero). These options will be remembered for future uploads.
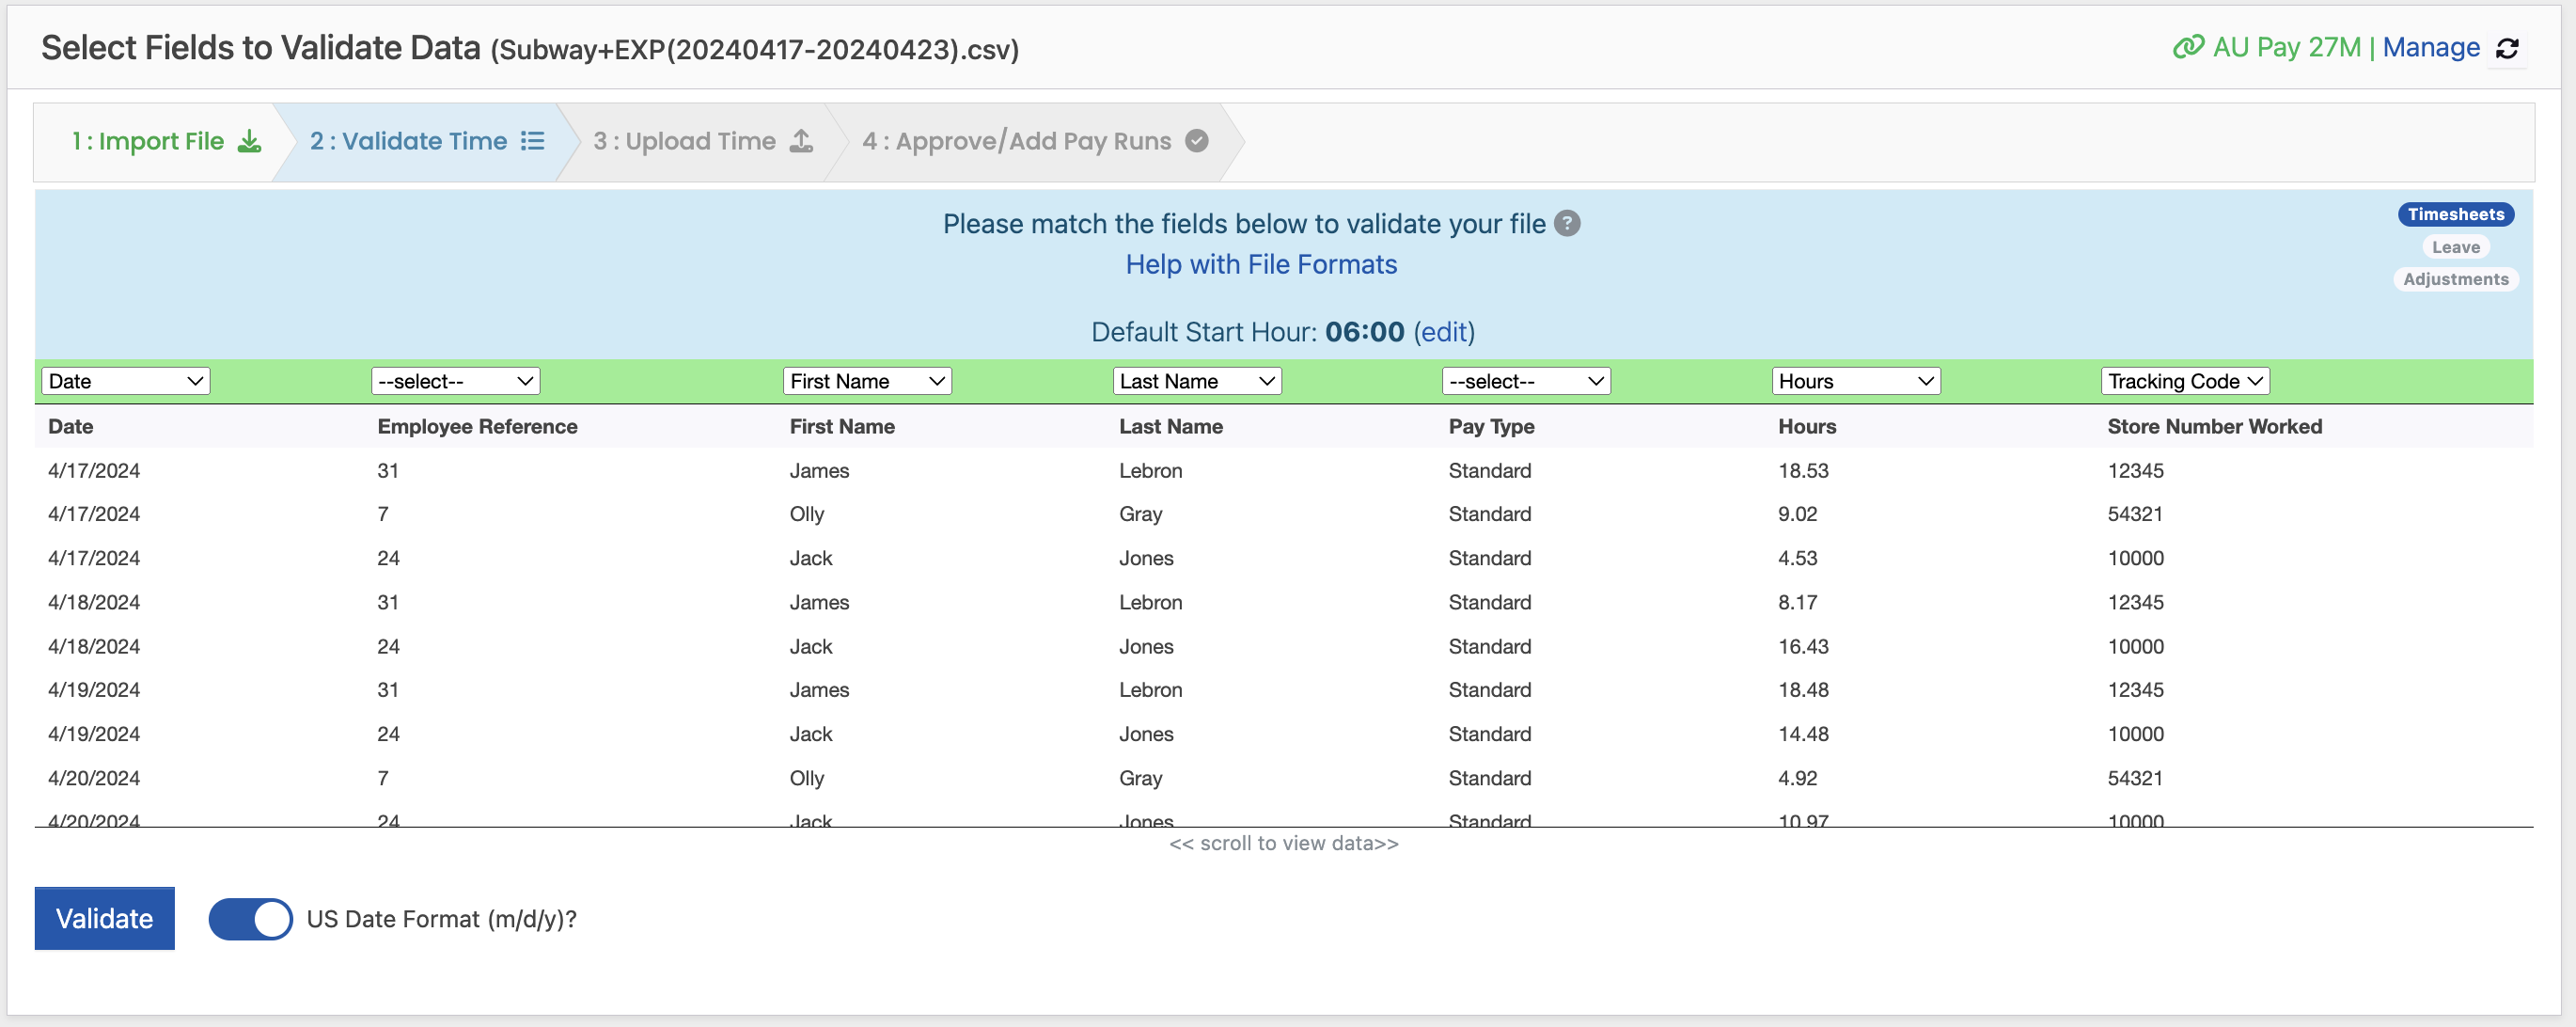
Click Validate to check the data against Xero before uploading.
The validated data is shown. If any employees or tracking codes do not match what is stored in Xero you can click Create Mapping to create an automatic mapping for future uploads. Alternatively, you can select rows and click Edit to update them. After changes, you may need to revalidate your file before uploading.
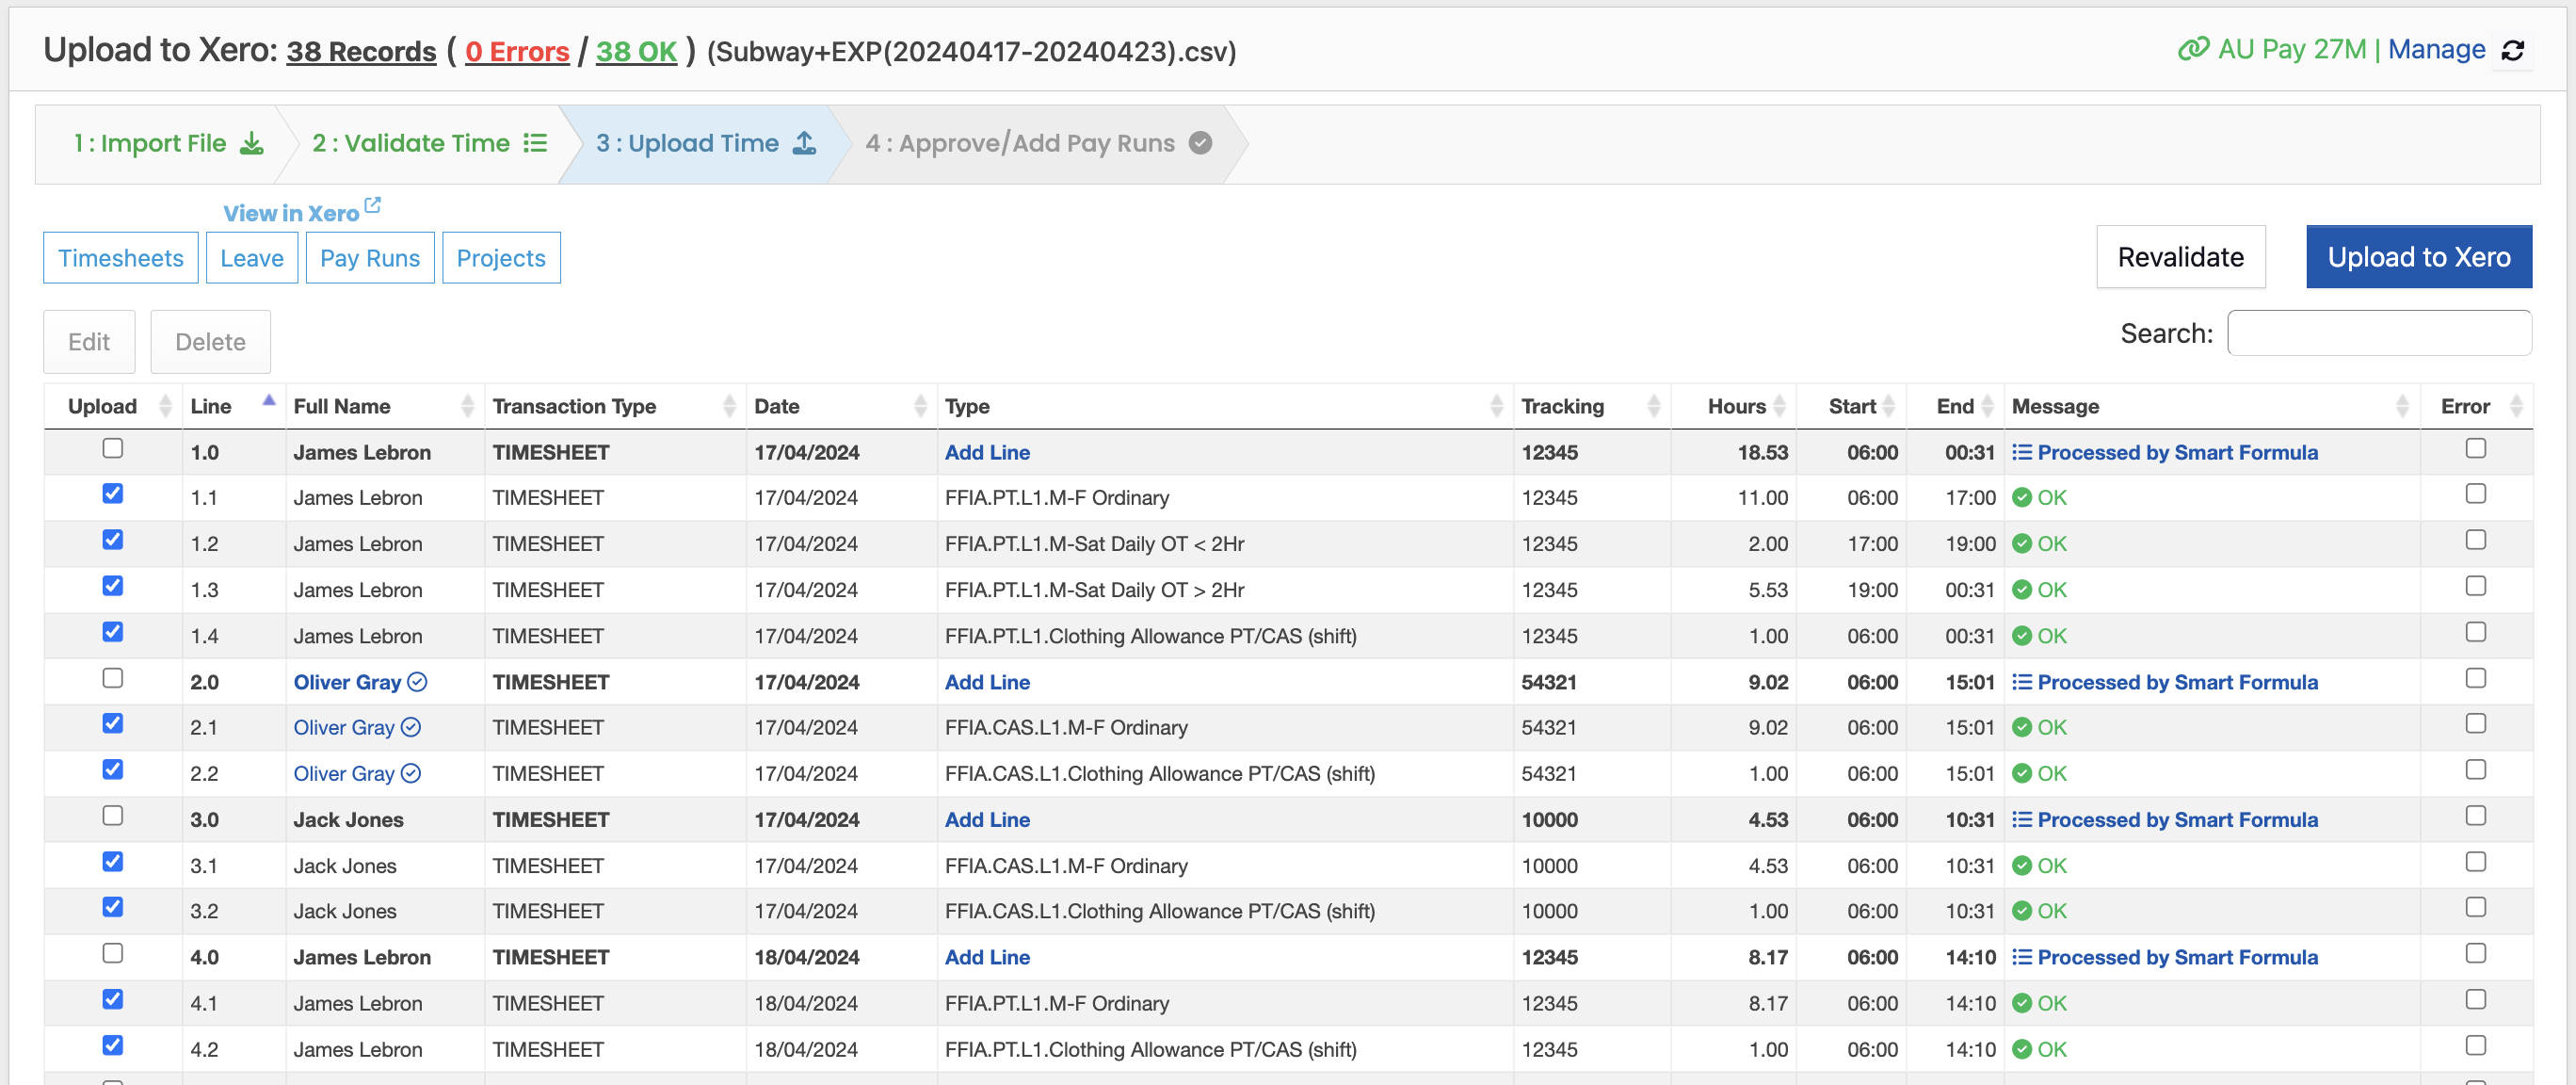
6. Upload Data to Xero
Once complete simply click Upload to Xero. Any required pay items will be created and the timesheet data will be uploaded to Xero.
Useful Links
For more information on the below topics please refer to the links below:
Assigning Smart Formulas:
https://help.upsheets.com/faqs/smart-formulas-upsheets
Automatically Calculate Start and End Times Using Hours
https://help.upsheets.com/faqs/automatically-calculate-start-and-end-times-using-hours
Mapping values between systems:
https://help.upsheets.com/faqs/create-a-mapping-for-employee-type-or-tracking-code
Editing imported data:
https://help.upsheets.com/faqs/editing-imported-files-before-uploading-to-xero
Defining public holidays:
https://help.upsheets.com/faqs/using-public-holidays-with-smart-formulas